Archive for category Music Rehearsal Spaces
Similar, Yet Different: Aeolian® vs. MiniAeolian™

In this installment of “Similar, Yet Different”, we are going to compare the two current variations of the popularAeolian®Diffuser-原2 'x2风成和1 'x1 MiniAeolian™!
Design
This comparison has some similarities to the very first“Similar, Yet Different” post we made comparing the ArtDiffusor®Model C to the ArtDiffusor®Model F.We are looking at a diffuser that uses identical mathematic functions to create the shape… both theAeolian®and the MiniAeolian™ are an “Organic Quadratic” constructed from a Bicubic Interpolation of a Quadratic Residue Function. They are both truncated so that they are completely asymmetric, even to the edge. The MiniAeolian™ISanAeolian®, only it is scaled differently.
You may recall that theModel Fwas constructed of 4 scaled downModel Cdiffusers in a monolithic 2’x2′ tile – This is not the case with the MiniAeolian™. The OriginalAeolian®Diffuser is a 2’x2′ footprint that is 5″ tall, and will fit in a standard 2’x2′ ceiling grid. The MiniAeolian™is a single scaled down unit, and it is a little different – The 1’x1′ footprint stands alone as a single unit, but it is only scaled down in height to 4″.
In this case, form follows function. The MiniAeolian™was built to fill a specific function as a smaller wall-mount unit, or a direct-mount ceiling unit for smaller spaces. Part of this wall-mount function was to have a version of theAeolian®that would fit in tight areas or in spaces that didn’t have enough clearance for the 5″ standardAeolian®(或需要修改这些地区(或diffusers) to allow this extra height). Some people implement configurations that have tighter footprint requirements, and the 1’x1′ footprint of the Mini allow it to be used in these types of layouts.
Performance
So how does this change affect the performance of the unit? Surprisingly, they are quite similar. The Organic curved design, with only a 20% reduction in height, shows only minor differences in performance of their overall frequencies ranges – with both primary ranges starting at about 1500Hz-1600Hz with and average between 150° and 170° of horizontal and vertical dispersion up to between 5Khz and 7Khz. While the primary range is a good indicator, when we look at the actual polar response, we can get a better picture of their full range performance.

A quick glance shows two very similar performing diffusers, except for the low-frequency performance. The larger elements and deeper formfactor of the originalAeolian®are more effective at the 1000Hz range, where the MiniAeolian™appears to be mostly specular. There are some surprises however. It appears that at the 2000Hz range leans slightly in the favor of using 4 MiniAeolians™in an array verses the singleAeolian®. There is more surface variation over the same footprint (2’x2′ in the array of 4), and the size of the Mini’s features are a bit more optimal for diffusing the 2Khz wavelength. This swings back slightly into the favor of the singleAeolian®at 4Khz, where the larger elements have a wider throw, and the elements of the Mini have steeper wells. At 8Khz, it tips back to the Mini, and then at 16Khz, they are both neck-and-neck.
The amazing similarity is that the variations are quite subtle through their entire effective ranges, and even quite a bit above those ranges. While there are slight differences in the performance of the diffusers when we compare the directly, these are really very minimal except for the low-frequency edge in performance of the larger originalAeolian®.
Closing
With the similarity of performance in the two diffusers, they can almost be used interchangeably – or even used together in the same environment to implement an aesthetic vision or add more randomness/variety to the diffusion in the space.
There are several occasions where you may require one over the other.
- If you need more 1Khz diffusion, you should add some 2’x2′Aeolians®– as they perform better in that range.
- If you need to install diffusers that fit in a ceiling grid… you will also want to use the original.
- If you want theAeolian®but need diffusers that will fit in a space that is less than 2’x2’x5″, you may want to go with the MiniAeolian™.
Currently the MiniAeolian™ is a custom order item only, and is subject to minimum order quantities.
Contact Acoustics First®for more information and pricing.
Absorption & Diffusion – The Construction Specifier
Posted byAcoustics FirstinAbsorption,Art Galleries,Articles,Auditorium,Broadcast Facilities,Diffusion,Home Entertainment,Home Theater,HOW TO,Industrial Facilities,Media Room,Multipurpose Rooms,Music Rehearsal Spaces,Offices,开云体育手机版 ,Recording Facilities,Studio Control Room,Teleconferencing,Theateron April 29, 2022
For the May 2022 edition of “The Construction Specifier,” Acoustics First was asked to illustrate the use of absorption and diffusion in creating optimal acoustic spaces. The article is a great reference for understanding the types of acoustic absorbers and diffusers, as well as some use scenarios like offices, critical listening spaces, and larger communal spaces.
Note: This version has been edited and the advertisements are removed. The full published version of the May 2022 digital edition can be found on The Construction Specifier’s websitehere.
Sonora® LFC – Low-Frequency Control Panel
Posted byAcoustics FirstinAbsorption,Auditorium,Home Entertainment,Home Theater,Multipurpose Rooms,Music Rehearsal Spaces,Music Tracking Room,Press Release,开云体育手机版 ,Products,Recording Facilities,Recording Studio,Studio Control Room,Theater,Uncategorized,Vocal Booth,Voice Over,Worship Facilitieson May 24, 2021
Bass frequencies are difficult to control… and there is sometimes a tendency to overuse standard, broadband panels to try to absorb everything in order to get rid of that bass. However, this method is unbalanced and has the side-effect of leaving a room sounding muffled and boomy.
Why?
Physics!High frequencies are easier to absorb than low frequencies.So, when you ONLY use broadband absorbers, they easily remove the high frequencies and leave more of the lows. Overusing broadband absorption in a large performance space can be a disaster – leaving an environment lacking energy and feel – many describe this condition as a room sounding “dead.”(Not good!)
So how can you treat the boomy bass without killing your rooms with too much broadband absorption? Can you just take out the bass? Unfortunately, it is impossible to ONLY absorb the bass, but we can LIMIT the amount of high frequency energy that we absorb to balance out the response.
Acoustics First® presents… theSonora® LFC – Low-Frequency control panel.

TheSonora® LFClooks like a standardSonora® Wall panel, but looks can be deceiving! At 4-1/8″ thick, it is virtually indistinguishable from aHigh-Impact Sonora® panel– however the interior structure of theLFCis optimized to attack the bass frequencies and smoothly roll off the high frequencies. Let’s take a closer look at the performance difference between theSonora® LFCand the standardSonora® panel.

When you look at the performance charts, you will notice that the standard 4″Sonora® panelstarts to “roll-off” in the lower frequencies below 125 Hz – it still absorbs them, just to a lesser degree. We designed theSonora® LFC panelto focus on those frequencies below 125 Hz – while allowing the other treatments to handle the rest! This allows you to use fewer broadband panels, and still have some high-frequency energy fordiffusersto spread around – thus creating a more balanced acoustic environment.
The Sonora® LFCis an engineered solution using the same high-performance materials as our other products, but combining them in a way that optimizes them forLow-Frequency Control– henceSonora®LFC!The magic is in the way those materials are used.

All of the materials used in an acoustic environment have a function – “Diffusers,” “Absorbers,” and “Bass Traps” are all general descriptors of product functions. Some diffusers are also Bass Traps. Some bass traps are also broadband absorbers. Some diffusers use absorption for amplitude grating. By combining a dampened, resonant trap with multi-density fiberglass, theSonora® LFCfocuses on making acoustic spaces more balanced. For controlling the bass without sucking the life out of a room, theLFC Panelis an outstanding tool for refined Low-Frequency Control!
DIY – Back Wall Diffuser Array/Bass Trap: Revisited
Posted byAcoustics FirstinAbsorption,Articles,Broadcast Facilities,Customer Feedback,Diffusion,DIY,Home Entertainment,Home Theater,HOW TO,Media Room,Music Rehearsal Spaces,Music Tracking Room,开云体育手机版 ,Recording Facilities,Recording Studio,Studio Control Room,Teleconferencing,Theater,Vocal Booth,Voice Overon July 14, 2016
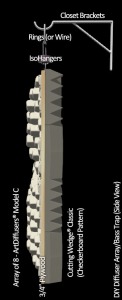
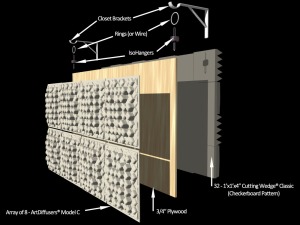
 This month we thought we’d share a few Real-Life pictures of an idea we first introduced back in summer of 2013:The “Back Wall Diffuser Array/Bass Trap”.
This is the DIY project which incorporates our Art Diffusors®, Cutting Wedge® foam and a couple of isolation hangers into one large free-floating unit, which is acoustically decoupled from the wall.
This particular array was put together by a music producer/bass player for his home. As you can tell from the pics, the construction of this unit was executed beautifully and it’s very close to the original concept drawings.
It’s never too late to get started on your ownDIY project.
Visit the Original DIY page to find out how to make your own.
DIY – Treating a Wall – BlockAid® and SoundChannels®
Posted byAcoustics FirstinAbsorption,Animal Shelters,Auditorium,Broadcast Facilities,Classrooms,DIY,Fitness,Government,Gymnasium,Home Entertainment,Home Theater,HOW TO,Media Room,Multipurpose Rooms,Music Rehearsal Spaces,Music Tracking Room,开云体育手机版 ,Recording Facilities,Recording Studio,School & Educational Facilities,Sound proofing,Studio Control Room,Teaching Rooms,Teleconferencing,Theater,Uncategorized,Vocal Booth,Voice Overon July 16, 2015
 On many occasions, we get asked about common ways to treat a wall (or walls) either for broadcast, podcast, or other voice recording scenario – where they not only want to tame the reflections within the room, but also block a certain amount of sound coming into – or leaving the room.
Budget is frequently an issue, major construction is usually unwanted, but effective results are always required.
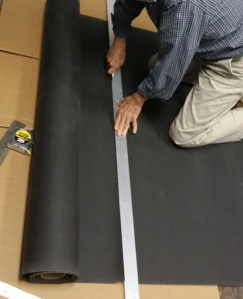
We’re going to show you how to handle a room upgrade – cut down on the sound transmission and cut the room reflections – all with the same skills required to hang high quality wall coverings! Let’s see how you can cover a wall withBlockAid® vinyl sound barrierto block unwanted sound, then go back and cover that with an absorptive layer ofSound Channels® wall coveringto finish it off!
This treatment is not recommended for renters, as this is not an easy upgrade to undo. However, if you have an extra bedroom you are using as Podcast studio, this is a great way to treat it… Let’s get started!
InstallingBlockAid®
Good job! Now, take a breather while that dries, and notice how much less sound is passing through the walls. This is when you will notice that the sounds are now coming from under the door, and through the leaky old window. These can be taken care of in different ways…. but the easiest way is the same way you deal with keeping the cold out! Get some weather strip, a door skirt, seal the gaps around the frame of the door, and windows, maybe go out and buy some heavy curtains for the windows… if you have some leftoverBlockAid®, you can always get some Industrial Velcro and temporarily stick a piece over the window!
InstallingSound Channels®
That’s it!
This treatment is a common first step in treating many professional broadcast studios – it gives you extra isolation with the barrier and takes the edge of the sound reflections. Many professional environments then go back and add some additional treatments such as bass traps, diffusers, and broadband absorber panels – especially if these studios are planning on bringing in any musical guests.
This isn’t just for home studios. It works great for kids play rooms, bedrooms, home theaters, home gyms, and any place you want to block sound and tame the sound inside the room.
Customize your space as you will, but this treatment is a consistent winner for cost and performance, and is a great way to get started without breaking the bank!


You must belogged into post a comment.